Hilarious really that I'm the one making a post like this (being that I have never been described as handy, crafty, or patient), but when I considered redoing two dressers this summer and searched the blogosphere for a good how-to, I couldn't find one! Well, not to the degree that a type-A person like me needs. So instead, I asked a bagillion people for their thoughts, borrowed some tools from our super sweet and handy neighbors, asked my mom to join me for the day of fun, and SET TO WORK!
The best "before" picture I got. Over-eager to get started I suppose.
Dresser #2 semi-before picture
Drawers- how bout that fancy liner?!
The goods from the neighbors. How lucky are we to have neighbors that let us borrow their tools AND bake for us?!
So this is a Black & Decker Power Sander. I highly recommend renting, buying, or borrowing one rather than hand-sanding. Unless you are a patient person. I like for things to get done. Quickly. So hand-sanding is not for me. :)
Sweet neighbor, Sarah- the baker and the wife of the power-tool owner. ;)
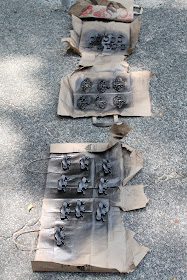
We took off the original hinges and used spray paint to make them look new.
This came recommended by my friend Andrea, who is a dresser re-doer pro. She turned this dresser into this changing table for the nursery, and has used the Rust-oleum on some of her other handy projects. :)
Rust-oleum, Metallic Paint and Primer in One
Shade = Oil Rubbed Bronze
Sweet mama :)
Brand new! LOVE this stuff!
Now for the sanding- I recommend getting a larger pack to be safe (I think I used around 10 on the two dressers). If you look on the back, it will tell you the recommended "grit" for your project. I went with 100 grit for prepping furniture for paint because that was exactly what I wanted to do. :)
This is actually after I figured out that Eric (power-tool-owner neighbor) already HAD a sander sheet on here- no wonder mine kept flying off when I first started! ...haha, yes- the base of the sander is metal-looking, so check to see if yours has a worn-out sander sheet left on it before you try to add another one of top- because it won't work with two. :)
NOW I get it! haha... mom and I got a good laugh out of my novice mistake.
Getting ready to spray the next set of hinges!
Oh yeah- time for a refresher. :)
LOVE this paint color!
Home Depot Behr- Anonymous
Also stolen from Andrea- the color of her nursery walls. :)
Before sanding...
After sanding- there are still some brown shades, but the wood was smooth. You can pretty much feel when it's ready (I guess... haha, our finished product still looks good!)
Make sure you thoroughly wipe down the wood before painting- damp rag, then dry rag.
Time to dry!
(Plus my secret shot of the backyard that's looking a million times better these days! Yay for new grass and a fire pit... boo for summer water bills.)
We let them dry for a few hours outside, then brought them inside (still all separated) and let them dry some more while we went to Tin Lizzy's and Menchie's. YUM!
When we got back, we moved the pieces back into the bedroom, screwed the hinges back on, and put the drawers back in place!
Yippee!!!
Hooray!!! We did it!
Thanks mama for all your help! And neighbors and friends for all your advice. :)
Questions? Ask away. I can try to answer. :) But if I can do this, anyone can.


They look so great Heather! Y'all did an amazing job! I love the color- we actually used the same paint when I redecorated my mom's dining room!
ReplyDeleteWow! Super cool. I have never thought of doing something like that but now I definitely think it is a project I would like to tackle. Thanks for the step by step instructions!
ReplyDeleteThey look brilliant! I have a sideboard I want to paint but have not plucked up the courage yet although after seeing how good your dressers look I might have to get on with it!
ReplyDeleteAlison
x
Wow! That is amazing!! It looks so good!!!
ReplyDeleteLooks great! The pic of you with the power tool was awesome. :) You go, Heather!
ReplyDeleteHappy seeing beautiful!
They look amazing! What a fun project to do with your mom! And you are too cute with the power tool photo! :)
ReplyDeleteHave a wonderful weekend!
Xoxox
Hi Heather! Great job on the dressers. Looks like you and mom had some fun during the process as well. Over from Mom's Monday mingle and now following :) Hope your weekend was great!
ReplyDeleteThat is awesome! I wish I were that handy! They look great :)
ReplyDeleteStopping my from the Monday Blog Hop and new follower! Wow, you guys did a fabulous job! If only I could inspire such handiwork out of my neighbors ;)(and how sweet that you got cupcakes too!)
ReplyDeleteLove your dresser redo and loved your whole blog so much I'm a follower now! I also enjoyed your last post of the classroom makeover. I'm also a teacher way up north in Illinois. :)
ReplyDeleteI found you through the blog hop at Naptime Review. Hope you'll check out my blog, too. :)
www.dawnmalcolm.blogspot.com
Hiya, I just stopped by after visiting the Naptime Review Blog Hop! Wow, those dressers look great. You have inspired me now because I have one in the garage that is looking a bit sad and tired.
ReplyDeleteI am your newest follower on Google Friends. Hope you can stop by my place too!
http://www.thedayafteryesterday.co.uk/
Looks great! I think we have two pieces of brand new furniture in our house because I prefer to just jazz the older stuff up like you :)
ReplyDelete